
1. Was macht Rikus LiveStick?
1. What does Rikus LiveStick do?
Es schreibt eine ISO-Datei auf einen USB-Stick – oder auf eine USB-Festplatte –, sodass ein Rechner davon starten kann. Eine ISO-Datei ist ein ganzes System in einer einzigen Datei – so bieten Linux-Systeme und Windows ihre Live- und Installationsfassungen an.
It writes an ISO file to a USB stick – or to a USB hard disk – so that a computer can start from it. An ISO file is a whole system in one single file – that is how Linux systems and Windows offer their live and installer editions.
Ein Live-System startet direkt vom Stick, ohne etwas auf dem Rechner zu verändern. Normalerweise vergisst es beim Ausschalten alles. Mit dem Speicherbereich von LiveStick bleiben deine Einstellungen und Dateien erhalten.
A live system starts straight from the stick without changing anything on the computer. Normally it forgets everything when switched off. With LiveStick’s storage area your settings and files stay.
Nimm die Live-ISO. Bei Debian, Devuan, Fedora, openSUSE und Mageia gibt es neben der Live-ISO auch Installations-Abbilder (im Namen oft „netinst“, „install“ oder „DVD“). Mit denen wird der Stick nur ein Installationsstick, ein Speicherbereich ist dann nicht möglich.
Take the live ISO. Debian, Devuan, Fedora, openSUSE and Mageia offer installer images next to the live ISO (often named “netinst”, “install” or “DVD”). With those the stick only becomes an installer stick; a storage area is not possible then.
Wichtig: Beim Schreiben wird alles gelöscht, was vorher auf dem Datenträger war.
Important: writing erases everything that was on the drive before.
2. Holen und installieren
2. Getting and installing it
- Auf der Startseite „Kostenlos anfordern“ drücken und Name, E-Mail und Land eintragen.
- Die E-Mail öffnen – schau auch im Spam-Ordner nach. Darin stehen dein Code und der Link zur Datei.
- Die Datei über den Link holen und im Terminal installieren – mit dem Ordner, in dem sie liegt.
- Press “Get it free” on the home page and enter name, e-mail and country.
- Open the e-mail – check your spam folder too. It contains your code and the link to the file.
- Get the file through the link and install it in a terminal – with the folder it is in.
sudo apt install ~/Downloads/rikus-livestick_1.5_all.debMeldet dein System „Nicht unterstützte Datei … auf Befehlszeile angegeben“, liegt die Datei nicht in diesem Ordner – dann den richtigen Ordner einsetzen.
If your system says “Unsupported file … given on commandline”, the file is not in that folder – then put in the right folder.
Oder über die Paketquelle apt.rikus.info – dann kommt jede neue Fassung
von selbst mit deinen Systemaktualisierungen. Einmal diese drei Zeilen:
Or through the package source apt.rikus.info – then every new version
arrives on its own with your system updates. These three lines, once:
sudo install -d /etc/apt/keyrings && sudo curl -fsSL https://apt.rikus.info/rikus-apt.gpg -o /etc/apt/keyrings/rikus.gpg
echo "deb [signed-by=/etc/apt/keyrings/rikus.gpg] https://apt.rikus.info stable main" | sudo tee /etc/apt/sources.list.d/rikus.list
sudo apt update && sudo apt install rikus-livestickDanach steht Rikus LiveStick im Startmenü unter „System“. Das Programm gibt es als Paket für Debian und verwandte Systeme wie Ubuntu und Linux Mint. Alles, was es braucht, kommt beim Installieren von selbst mit.
After that Rikus LiveStick is in the application menu under “System”. The program comes as a package for Debian and related systems such as Ubuntu and Linux Mint. Everything it needs comes along when installing.
3. Freischalten
3. Unlocking
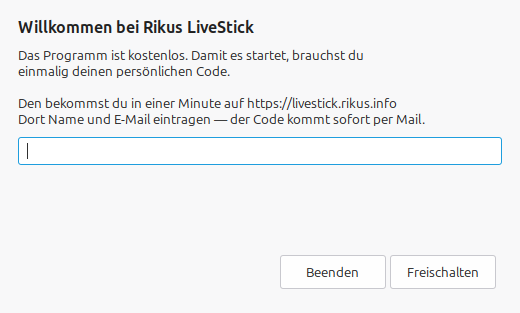
Beim allerersten Start fragt LiveStick nach deinem Code. Eintippen, „Freischalten“ drücken – fertig. Dafür braucht der Rechner einmal Internet. Danach fragt LiveStick nie wieder.
At the very first start LiveStick asks for your code. Type it in, press “Unlock” – done. The computer needs the internet once for this. After that LiveStick never asks again.
Mail mit dem Code verlegt? Einfach auf der Startseite noch einmal mit derselben E-Mail-Adresse anmelden.
Lost the e-mail with the code? Simply sign up again on the home page with the same e-mail address.
4. Das Fenster – jeder Knopf einzeln
4. The window – every button, one by one
Ganz oben
At the top
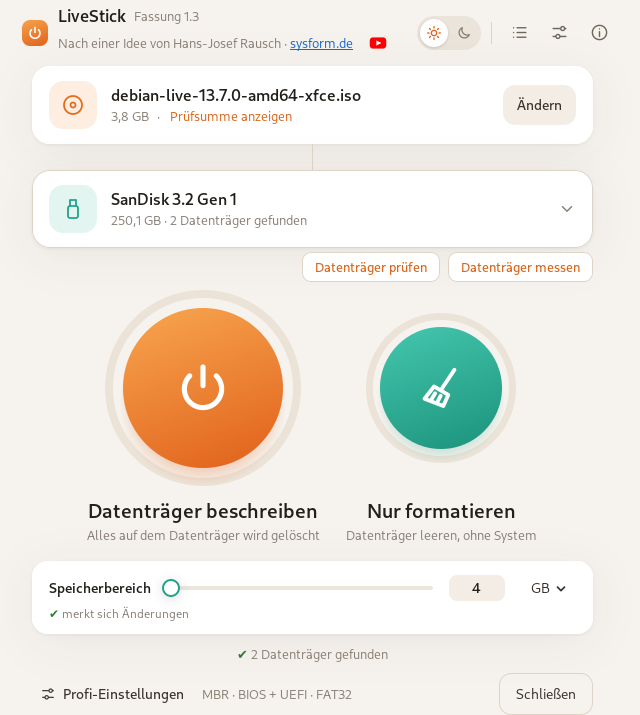
Neben dem Namen steht die Fassung – so siehst du sofort, welche du hast. Rechts daneben:
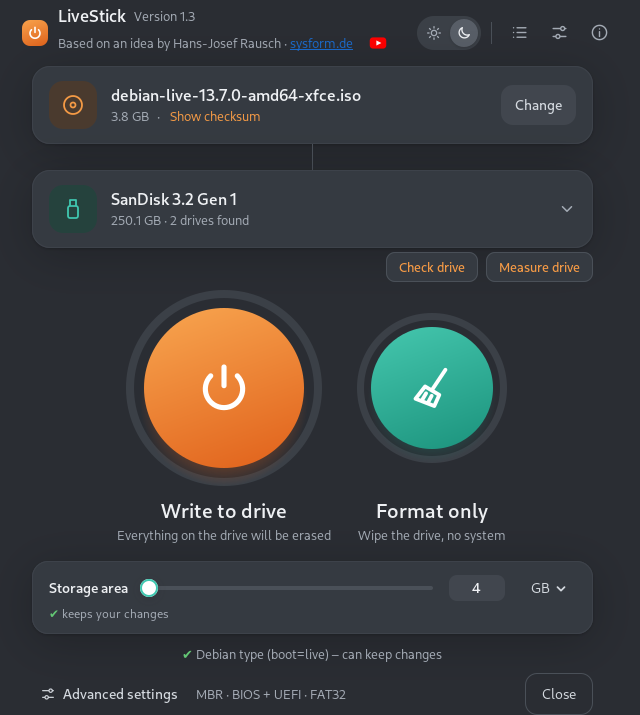
Next to the name you see the version – so you know right away which one you have. To the right:
- Sonne / Mond – hell oder dunkel.
- Liste – das Protokoll: Schritt für Schritt, was gerade passiert.
- Schieberegler-Zeichen – die Einstellungen (siehe Punkt 11).
- i – über Rikus LiveStick: Fassung und Nutzungsbedingungen.
- Sun / moon – light or dark.
- List – the log: step by step, what is happening.
- Slider symbol – the settings (see point 11).
- i – about Rikus LiveStick: version and terms of use.
Die obere Karte: die ISO-Datei
The top card: the ISO file
„Datei wählen“ (später „Ändern“) öffnet die Auswahl für ISO- und IMG-Dateien. Darunter stehen die Größe und „Prüfsumme anzeigen“ – damit vergleichst du die Datei mit der Angabe auf der Seite, von der du sie hast.
“Choose file” (later “Change”) opens the selection for ISO and IMG files. Below it you see the size and “Show checksum” – with it you compare the file with the value on the page you got it from.
Die zweite Karte: der Datenträger
The second card: the drive
Hier steht der eingesteckte Stick mit Name und Größe. Ein Klick auf die Karte öffnet eine Liste: dort wählst du einen anderen Datenträger, und dort stehen auch „Diesen Datenträger messen …“ und „Diesen Datenträger prüfen …“. Eingebaute Festplatten erscheinen hier nie.
This shows the plugged-in stick with name and size. A click on the card opens a list: there you choose another drive, and there you also find “Measure this drive …” and “Check this drive …”. Built-in hard disks never appear here.
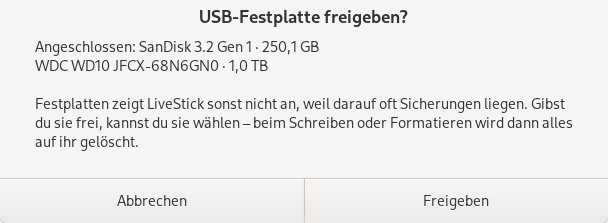
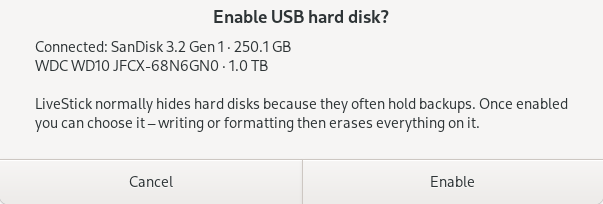
USB-Festplatten zeigt LiveStick erst, wenn du sie freigibst – darauf liegen oft Sicherungen. Steckt eine, steht auf der Karte „Festplatte angeschlossen – noch nicht freigegeben“. Ein Klick darauf fragt nach, und „Freigeben“ macht sie wählbar. (Steckt schon ein Stick, steht in der Liste „USB-Festplatte freigeben …“.)
USB hard disks are only shown after you enable them – they often hold backups. If one is plugged in, the card says “Hard disk connected – not enabled yet”. A click on it asks first, and “Enable” makes it selectable. (If a stick is plugged in too, the list shows “Enable USB hard disk …”.)
Unter der Karte stehen „Datenträger prüfen“ und „Datenträger messen“ (siehe Punkt 7).
Below the card you find “Check drive” and “Measure drive” (see point 7).
Der große Knopf: „Datenträger beschreiben“
The big button: “Write to drive”
Startet das Schreiben. Vorher kommt die Warnung „Alles auf … wird gelöscht.“ – hat der Datenträger mehrere Bereiche, noch eine zweite. Mit OK geht es weiter, dann fragt dein Rechner nach deinem Passwort. Während des Schreibens zeigt der Ring, wie weit es ist, darunter steht der gerade laufende Schritt und „Bitte den Datenträger nicht abziehen“. Darunter steht der Knopf „Abbrechen“: Er fragt einmal nach („Weitermachen“ oder „Ja, abbrechen“) und hält das Schreiben dann nach wenigen Sekunden an. Der Datenträger ist danach nur halb beschrieben – schreib ihn neu oder formatiere ihn. Das gilt auch für „Nur formatieren“.
Starts writing. First comes the warning “Everything on … will be erased.” – if the drive has several partitions, a second one. OK continues, then your computer asks for your password. While writing, the ring shows how far it is, below it the current step and “Please do not unplug the drive”. Below that is the “Cancel” button: it asks once (“Keep going” or “Yes, cancel”) and then stops writing within a few seconds. The drive is then only half written – write it again or format it. This also applies to “Format only”.
Am Ende steht „Fertig – der Datenträger ist bereit“ und „Du kannst ihn jetzt abziehen“, dazu der Knopf „Protokoll ansehen“. Bei den meisten Systemen kommt noch ein Hinweis: Die Änderungen werden beim Herunterfahren auf den Stick geschrieben – darum immer über das Menü herunterfahren (siehe Punkt 5).
At the end it says “Done – the drive is ready” and “You can unplug it now”, together with the “Show log” button. With most systems a note follows: the changes are written to the stick when shutting down – so always shut down from the menu (see point 5).
Ging etwas schief oder wurde der Datenträger zu früh abgezogen: einfach noch einmal schreiben.
If something went wrong or the drive was unplugged too early: simply write it again.
Der zweite Knopf: „Nur formatieren“
The second button: “Format only”
Leert den Datenträger und formatiert ihn neu – ganz ohne System (siehe Punkt 8).
Wipes the drive and formats it again – without any system (see point 8).
Unten: Speicherbereich
Bottom: storage area
Der Regler – oder die Zahl daneben – bestimmt, wie viel Platz der Datenträger bekommt, um sich Änderungen zu merken. Daneben wählst du die Einheit. 0 heißt: „Aus – der Datenträger merkt sich nichts“. Darunter steht, ob die gewählte Datei sich überhaupt etwas merken kann (siehe Punkt 5).
The slider – or the number next to it – sets how much room the drive gets to keep changes. Next to it you choose the unit. 0 means: “Off – the drive keeps nothing”. Below it you see whether the chosen file can keep anything at all (see point 5).
Ganz unten
At the very bottom
„Profi-Einstellungen“ (siehe Punkt 6) und daneben eine kurze Zusammenfassung, zum Beispiel „MBR · BIOS + UEFI · FAT32“. „Schließen“ beendet das Programm.
“Advanced settings” (see point 6) and next to it a short summary, for example “MBR · BIOS + UEFI · FAT32”. “Close” ends the program.
5. Der Speicherbereich
5. The storage area
Ohne Speicherbereich
Without a storage area
- Du startest vom Stick.
- Du änderst das Hintergrundbild und speicherst eine Datei.
- Du schaltest aus.
- Beim nächsten Start ist alles wieder wie vorher.
- You start from the stick.
- You change the wallpaper and save a file.
- You switch off.
- At the next start everything is back as it was.
Mit Speicherbereich
With a storage area
- Du startest vom Stick.
- Du änderst das Hintergrundbild und speicherst eine Datei.
- Du fährst über das Menü herunter – alles landet im Speicherbereich auf dem Stick.
- Beim nächsten Start ist alles noch da.
- You start from the stick.
- You change the wallpaper and save a file.
- You shut down from the menu – everything goes into the storage area on the stick.
- At the next start everything is still there.
Immer über das Menü herunterfahren. Bei den meisten Systemen hält LiveStick deine Änderungen während der Arbeit im Arbeitsspeicher und schreibt sie beim Herunterfahren oder Neustarten auf den Stick – das macht den Start schneller und schont den Stick. Beim einfachen Ausschalten gehen die Änderungen dieser Sitzung verloren. Void Linux und Devuan schreiben sofort auf den Stick.
Always shut down from the menu. With most systems LiveStick keeps your changes in memory while you work and writes them to the stick when you shut down or restart – that makes starting faster and is gentle on the stick. If you simply switch off, the changes of this session are lost. Void Linux and Devuan write to the stick straight away.
Was unter dem Regler steht – LiveStick liest die Datei und sagt es dir, bevor du schreibst:
What it says below the slider – LiveStick reads the file and tells you before you write:
- „✔ merkt sich Änderungen“ und „✔ … kann sich Änderungen merken“ – der Speicherbereich klappt mit dieser Datei.
- „Diese ISO-Datei kann sich keine Änderungen merken.“ – die Datei ist nicht dafür gebaut.
- „Das ist ein Installations-Abbild, kein Live-System — es kann sich nichts merken.“ – dann die Live-ISO nehmen.
- “✔ keeps your changes” and “✔ … can keep changes” – the storage area works with this file.
- “This ISO file cannot keep changes.” – the file is not built for it.
- “This is an installer image, not a live system — it cannot remember anything.” – then take the live ISO.
Gut zu wissen bei einzelnen Systemen:
Good to know about some systems:
- Die Live-ISO nehmen: Debian, Devuan, Fedora, openSUSE und Mageia. Für openSUSE Leap 16 gibt es keine Live-ISO – das Installationsprogramm wird als 1:1-Kopie geschrieben und kann sich nichts merken; Leap 15.6 Live geht.
- Nur neue Rechner (UEFI): openSUSE, Manjaro und PikaOS (PikaOS braucht außerdem einen neueren Prozessor, Stufe x86-64-v3).
- Als 1:1-Kopie mit eigenem Speicherbereich dahinter: Mageia und PikaOS.
- Void Linux: mit dem Eintrag „RAM“ im Startmenü läuft Void ganz aus dem Arbeitsspeicher – auch mit Speicherbereich; das schont den Stick.
- BigLinux: merkt sich Änderungen, der Start dauert aber sehr lange.
- Take the live ISO: Debian, Devuan, Fedora, openSUSE and Mageia. There is no live ISO for openSUSE Leap 16 – its installer is written as a 1:1 copy and cannot remember anything; Leap 15.6 Live works.
- New computers only (UEFI): openSUSE, Manjaro and PikaOS (PikaOS also needs a newer processor, level x86-64-v3).
- As a 1:1 copy with its own storage area behind it: Mageia and PikaOS.
- Void Linux: with the “RAM” entry in the boot menu Void runs entirely from memory – with the storage area, too; that is gentle on the stick.
- BigLinux: keeps changes, but starting takes very long.
Welche Systeme geprüft sind – mit dem genauen Dateinamen –, steht auf der Startseite.
Which systems were tested – with the exact file name – is listed on the home page.
6. Die Profi-Einstellungen
6. The advanced settings
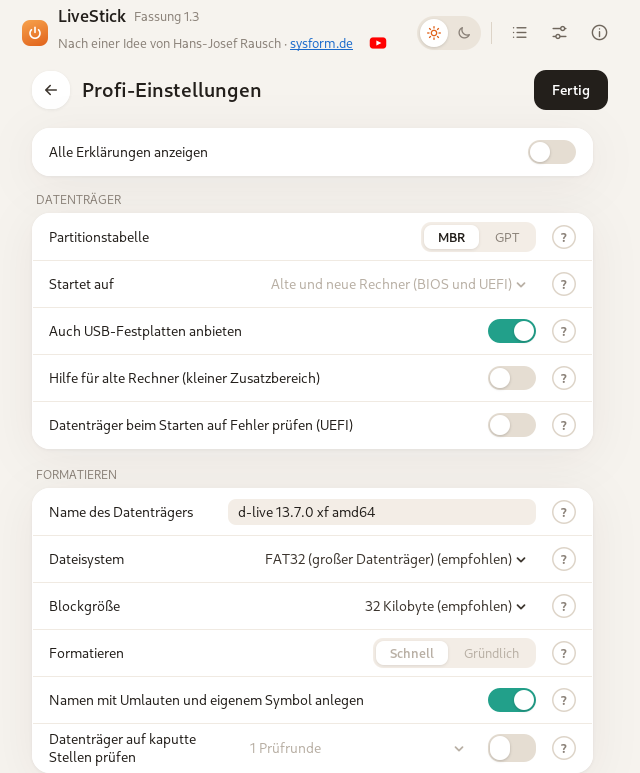
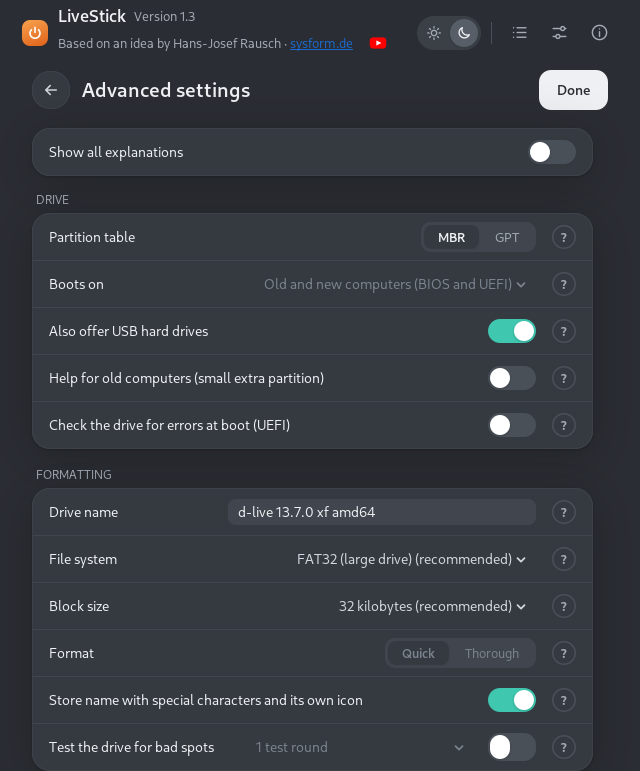
LiveStick wählt alles passend zur Datei vor. Ändern musst du hier nur, wenn du es genau anders willst. Das „?“ am Ende jeder Zeile erklärt die Einstellung; „Alle Erklärungen anzeigen“ klappt alle auf einmal auf. „Fertig“ führt zurück.
LiveStick preselects everything to fit the file. You only need to change something here if you want it different. The “?” at the end of each line explains the setting; “Show all explanations” opens them all at once. “Done” takes you back.
Datenträger
Drive
- Partitionstabelle – wie der Datenträger aufgeteilt wird: MBR oder GPT.
- Startet auf – auf welchen Rechnern er starten soll: alte (BIOS), neue (UEFI) oder beide.
- Auch USB-Festplatten anbieten – zeigt auch externe USB-Festplatten in der Liste (dasselbe wie „Freigeben“). Vorsicht: Darauf liegen oft wichtige Daten!
- Hilfe für alte Rechner – legt einen kleinen versteckten Zusatzbereich an und richtet die Aufteilung aus. Das hilft manchen alten Rechnern, den Stick zu erkennen.
- Datenträger beim Starten auf Fehler prüfen (UEFI) – beim Starten prüft ein kleines Programm zuerst alle Dateien auf dem Stick.
- Partition table – how the drive is divided: MBR or GPT.
- Boots on – which computers it should start on: old (BIOS), new (UEFI) or both.
- Also offer USB hard drives – also shows external USB hard disks in the list (the same as “Enable”). Careful: they often hold important data!
- Help for old computers – adds a small hidden extra area and aligns the layout. That helps some old computers to recognise the stick.
- Check the drive for errors at boot (UEFI) – at start a small program first checks all files on the stick.
Formatieren
Formatting
- Name des Datenträgers – so heißt er später im Dateimanager.
- Dateisystem – wie die Dateien abgelegt werden. Empfohlen ist vorgewählt.
- Blockgröße – der kleinste Platz, den eine Datei belegt. Empfohlen ist vorgewählt.
- Formatieren: Schnell oder Gründlich – gründlich dauert deutlich länger.
- Namen mit Umlauten und eigenem Symbol anlegen – damit Umlaute richtig erscheinen und der Stick ein eigenes Symbol bekommt.
- Datenträger auf kaputte Stellen prüfen – beschreibt den ganzen Datenträger mit einem Muster und liest es wieder, so fallen kaputte Stellen auf. Daneben wählst du die Zahl der Prüfrunden. Das kann lange dauern.
- Drive name – what it will be called in the file manager.
- File system – how the files are stored. The recommended one is preselected.
- Block size – the smallest space a file takes up. The recommended one is preselected.
- Format: Quick or Thorough – thorough takes much longer.
- Store name with special characters and its own icon – so that umlauts show correctly and the stick gets its own icon.
- Test the drive for bad spots – writes a pattern over the whole drive and reads it back, so bad spots show up. Next to it you choose the number of test rounds. This can take a long time.
7. Datenträger messen und prüfen
7. Measuring and checking the drive
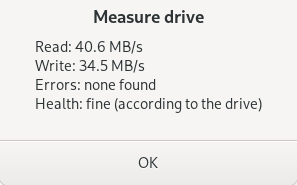
Unter der Datenträger-Karte auf „Datenträger messen“ drücken (oder in der Liste der Karte „Diesen Datenträger messen …“). LiveStick misst, wie schnell er liest und schreibt, sucht dabei nach Fehlern und fragt den Zustand ab. Dafür wird eine Testdatei auf den Datenträger geschrieben und wieder gelöscht – deine Dateien bleiben erhalten. Das dauert etwa eine Minute.
Below the drive card press “Measure drive” (or “Measure this drive …” in the card’s list). LiveStick measures how fast it reads and writes, looks for errors and asks for its health. For this a test file is written to the drive and deleted again – your files stay where they are. It takes about a minute.
Kein Platz für die Testdatei? Dann fragt LiveStick: „Ohne Schreibtempo“ – es misst nur das Lesen, und der Datenträger bleibt, wie er ist. Oder „Löschen und messen“ – dann wird auch das Schreiben gemessen, aber alles darauf geht verloren.
No room for the test file? Then LiveStick asks: “Without write speed” – it only measures reading, and the drive stays as it is. Or “Erase and measure” – then writing is measured too, but everything on it is lost.
„Datenträger prüfen“ – gleich daneben, auch ohne ISO-Datei. LiveStick fragt vorher, denn danach ist der Datenträger leer. Dann beschreibt es ihn ganz mit einem Muster, liest es zurück und zeigt am Ende: kaputte Stellen, Lese- und Schreibtempo und den Zustand. Das kann lange dauern.
“Check drive” – right next to it, also without an ISO file. LiveStick asks first, because afterwards the drive is empty. Then it writes a pattern across all of it, reads it back and shows at the end: bad spots, read and write speed and the health. This can take a long time.
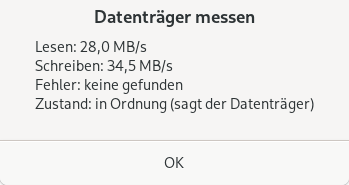
Das Ergebnis:
The result:
- Lesen / Schreiben – in MB/s. Je höher, desto schneller.
- Fehler – „keine gefunden“ ist gut. Werden welche gefunden, prüfe den Datenträger mit „Datenträger prüfen“.
- Zustand – „in Ordnung (sagt der Datenträger)“ oder eine Warnung. Viele Sticks geben ihren Zustand nicht heraus; dann steht dort „verrät dieser Datenträger nicht“.
- Read / Write – in MB/s. The higher, the faster.
- Errors – “none found” is good. If some are found, check the drive with “Check drive”.
- Health – “fine (according to the drive)” or a warning. Many sticks do not reveal their health; then it says “this drive does not tell”.
8. Nur formatieren
8. Format only
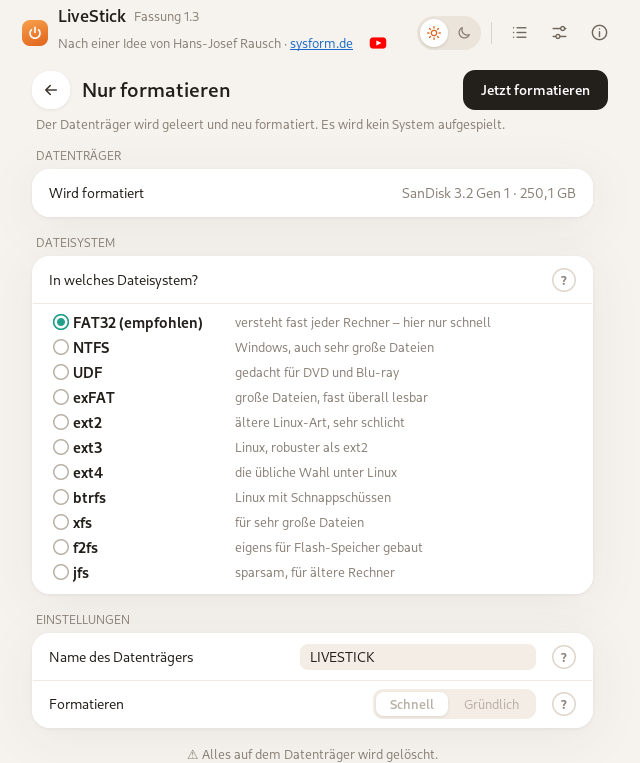
Der runde Knopf „Nur formatieren“ neben dem großen Knopf öffnet eine eigene Seite. Dort steht, welcher Datenträger formatiert wird, darunter die Dateisysteme – jedes mit einem kurzen Satz, wofür es gut ist. Du wählst eins, gibst auf Wunsch einen Namen ein, wählst Schnell oder Gründlich und drückst oben rechts „Jetzt formatieren“. Eine ISO-Datei braucht es dafür nicht.
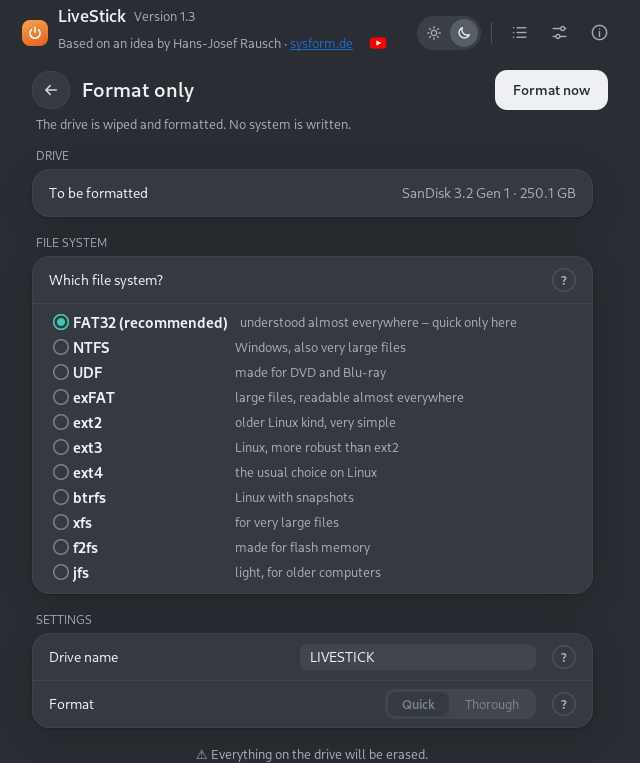
The round “Format only” button next to the big button opens its own page. It shows which drive will be formatted, below that the file systems – each with a short sentence about what it is good for. Choose one, enter a name if you like, choose Quick or Thorough and press “Format now” at the top right. No ISO file is needed for this.
Zur Wahl stehen bis zu elf Dateisysteme: FAT32, NTFS, UDF, exFAT, ext2, ext3, ext4, btrfs, XFS, F2FS und JFS. Einige erscheinen erst ab einer bestimmten Größe des Datenträgers. Ein großes FAT32 geht nur schnell.
Up to eleven file systems are offered: FAT32, NTFS, UDF, exFAT, ext2, ext3, ext4, btrfs, XFS, F2FS and JFS. Some only appear from a certain drive size on. A large FAT32 can only be formatted quickly.
9. Vom Stick starten
9. Starting from the stick
Stick in den Rechner stecken, einschalten und gleich das Startmenü des Rechners öffnen. Die Taste hängt vom Hersteller ab – oft F12, F11, F9 oder Esc. Dort den USB-Stick wählen.
Plug the stick into the computer, switch on and open the computer’s boot menu right away. The key depends on the maker – often F12, F11, F9 or Esc. Choose the USB stick there.
Zum Schluss immer über das Menü herunterfahren – sonst gehen bei den meisten Systemen die Änderungen dieser Sitzung verloren (siehe Punkt 5).
At the end always shut down from the menu – otherwise, with most systems, the changes of this session are lost (see point 5).
Der Stick wird abgewiesen? Dann ist oft Secure Boot eingeschaltet – eine Startsperre in den Einstellungen des Rechners. Manche Systeme starten nur, wenn sie ausgeschaltet ist, zum Beispiel Manjaro, openSUSE, EndeavourOS, CachyOS, BigLinux und Devuan. LiveStick warnt bei vielen Dateien schon beim Schreiben davor.
The stick is refused? Then Secure Boot is often switched on – a start lock in the computer’s settings. Some systems only start when it is switched off, for example Manjaro, openSUSE, EndeavourOS, CachyOS, BigLinux and Devuan. For many files LiveStick warns about it while writing.
10. Wenn etwas schiefgeht
10. If something goes wrong
- „Die Datei ist größer als der Datenträger.“ – einen größeren Datenträger nehmen.
- „Dateisystem passt nicht“ – in den Profi-Einstellungen ein anderes Dateisystem wählen oder eine andere ISO-Datei nehmen.
- „Datei zu groß für FAT32“ – in der ISO-Datei steckt eine Datei über 4 GB; FAT32 kann das nicht. Ein anderes Dateisystem wählen.
- „Startet nicht auf neuen Rechnern“ – die Datei kann nur auf alten Rechnern (BIOS) starten. Unter „Startet auf“ etwas anderes wählen oder eine andere ISO-Datei nehmen.
- „Die Datei liegt auf dem Datenträger selbst“ – sie wäre weg, bevor sie geschrieben ist. Die Datei zuerst auf den Rechner kopieren.
- „Kaputte Stellen gefunden“ – „Noch einmal prüfen“, „Trotzdem weiter“ oder „Abbrechen“. Im Zweifel lieber einen anderen Datenträger nehmen.
- Hinweis zu Secure Boot – der Datenträger wird trotzdem geschrieben; zum Starten muss Secure Boot im Rechner ausgeschaltet werden. Ist das Startprogramm der Datei gesperrt, lieber eine neuere Fassung vom Hersteller holen.
- „Hat nicht geklappt“ – „Protokoll ansehen“ zeigt, woran es hing. Über Mir schreiben kannst du es mir melden.
- “The file is larger than the drive.” – take a larger drive.
- “File system does not fit” – choose another file system in the advanced settings or take another ISO file.
- “File too large for FAT32” – the ISO file contains a file over 4 GB; FAT32 cannot hold it. Choose another file system.
- “Will not boot on newer computers” – the file can only start on old computers (BIOS). Choose something else under “Boots on” or take another ISO file.
- “The file is on the drive itself” – it would be gone before it is written. Copy the file to the computer first.
- “Bad spots found” – “Test again”, “Continue anyway” or “Abort”. When in doubt, better take another drive.
- Secure Boot note – the drive is written anyway; to start from it, Secure Boot must be switched off in the computer. If the file’s boot program is blocked, better get a newer version from the maker.
- “Failed” – “Show log” shows where it got stuck. Via Write to me you can report it to me.
11. Einstellungen und Fehlerberichte
11. Settings and error reports
Oben rechts das Schieberegler-Zeichen öffnet die Einstellungen. Dort steht der Schalter „Fehler anonym an rikus.info melden“. Er ist eingeschaltet.
The slider symbol at the top right opens the settings. There you find the switch “Anonymously report errors to rikus.info”. It is switched on.
Geht dann beim Schreiben etwas schief, schickt LiveStick eine kurze Meldung: welche Fassung von LiveStick, der Name des Systems, der Kernel, die Fehlerart und die Fehlermeldung, dazu Schreibart und Sprache. Namen, E-Mail-Adressen und persönliche Ordner werden vorher herausgenommen. Gespeichert wird außerdem nur das Land, aus dem die Meldung kommt – keine Adresse.
If something then goes wrong while writing, LiveStick sends a short report: which version of LiveStick, the name of the system, the kernel, the kind of error and the error message, plus the way of writing and the language. Names, e-mail addresses and personal folders are taken out first. Apart from that only the country the report comes from is stored – no address.
Wer das nicht möchte, schaltet den Schalter einfach aus.
If you do not want that, simply switch it off.