

LiveStick im Video
LiveStick on video
Ein Klick startet das Video – es wird dabei von YouTube geladen.
One click starts the video – it is then loaded from YouTube.
Wem das Video gefallen hat: bitte ein Like und ein Abo für Videos dieser Art.
If you liked the video, please give it a like and subscribe for more videos like this.
Das kann es – auf einen Blick
What it can do – at a glance
- ISO-Datei auf den Stick – mit einem Knopf. Für Linux-Systeme und für Windows-11-Installationssticks.
- Mit Speicherbereich. Einstellungen und Dateien bleiben auf dem Stick – auch nach dem Ausschalten.
- Es erkennt die Datei selbst: welche Art System darin steckt, ob es sich etwas merken kann und ob die Datei nur als 1:1-Kopie auf den Stick darf.
- Datenträger messen. Lese- und Schreibtempo, Fehler und – wenn der Stick ihn verrät – sein Zustand.
- Eingebaute Festplatten werden nie beschrieben. Angeboten werden USB-Sticks – USB-Festplatten erst, wenn du sie ausdrücklich freigibst. Vor dem Schreiben kommt eine Warnung mit dem Namen des Datenträgers.
- Für alte und neue Rechner. Die passende Startart stellt LiveStick selbst ein – wer mag, wählt sie selbst.
- Hell oder Dunkel, Deutsch oder Englisch – die Sprache richtet sich nach deinem System.
- ISO file onto the stick – with one button. For Linux systems and for Windows 11 installer sticks.
- With a storage area. Settings and files stay on the stick – even after switching off.
- It reads the file itself: what kind of system is inside, whether it can remember anything and whether the file may only go onto the stick as a 1:1 copy.
- Measure the drive. Read and write speed, errors and – if the stick reveals it – its health.
- Built-in hard disks are never written. USB sticks are offered – USB hard disks only after you enable them yourself. Before writing, a warning shows the name of the drive.
- For old and new computers. LiveStick sets the right way to start by itself – you can also choose it yourself.
- Light or dark, German or English – the language follows your system.
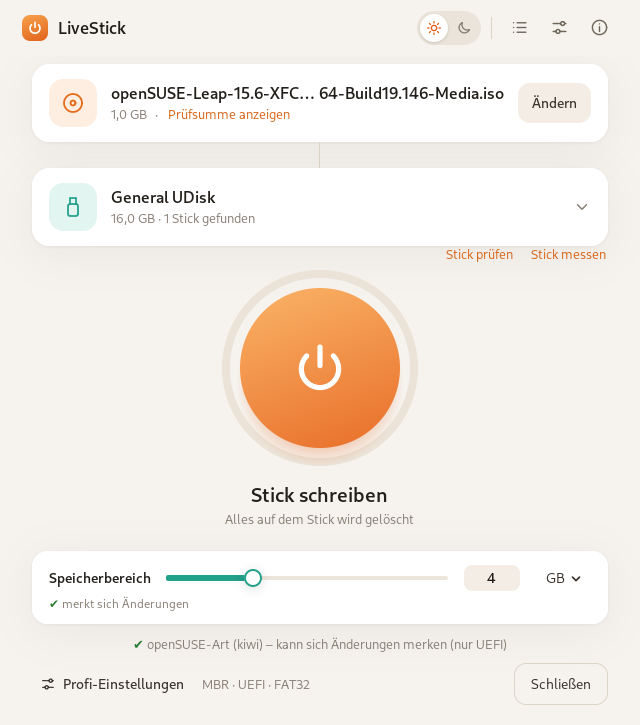
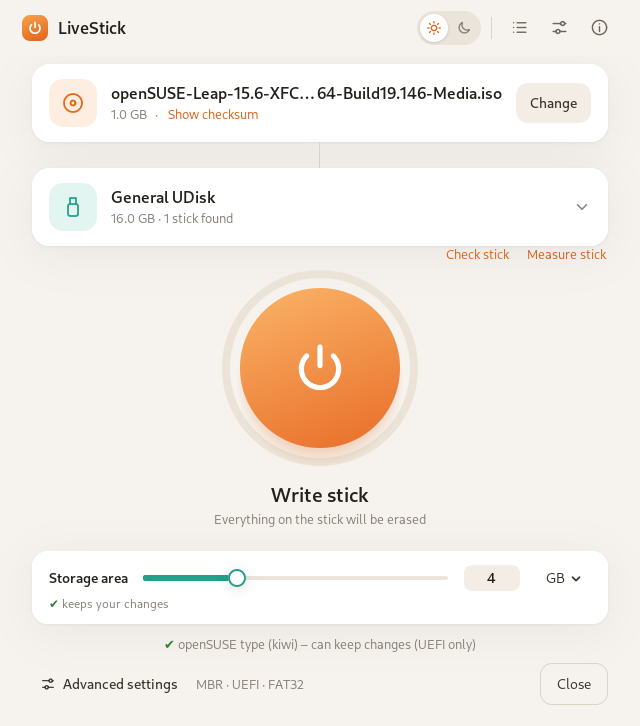
So sieht es aus: oben die ISO-Datei, darunter der Stick, in der Mitte der große Knopf. Unten stellst du den Speicherbereich ein.
This is how it looks: the ISO file at the top, the stick below it, the big button in the middle. The storage area is set at the bottom.
Der Speicherbereich – was ist das?
The storage area – what is it?
Ein Live-Stick mit Gedächtnis.
A live stick with a memory.
Ohne Speicherbereich
Without a storage area
- Du startest vom Stick.
- Du änderst das Hintergrundbild und speicherst eine Datei.
- Du schaltest aus.
- Beim nächsten Start ist alles wieder wie vorher.
- You start from the stick.
- You change the wallpaper and save a file.
- You switch off.
- At the next start everything is back as it was.
Wie eine CD: Man kann sie abspielen, aber nichts daraufschreiben.
Like a CD: you can play it, but you cannot write on it.
Mit Speicherbereich
With a storage area
- Du startest vom Stick.
- Du änderst das Hintergrundbild und speicherst eine Datei.
- Alles landet im Speicherbereich auf dem Stick.
- Beim nächsten Start ist alles noch da.
- You start from the stick.
- You change the wallpaper and save a file.
- Everything goes into the storage area on the stick.
- At the next start everything is still there.
Wie ein Notizheft, das neben der CD liegt.
Like a notebook lying next to the CD.
So stellst du ihn ein: Unten im Fenster den Regler „Speicherbereich“ auf die gewünschte Größe schieben. Steht darunter mit grünem Haken „merkt sich Änderungen“, klappt es mit dieser Datei.
How to set it: at the bottom of the window, move the “Storage area” slider to the size you want. If it says “keeps your changes” with a green tick underneath, it works with this file.
Warum es nicht bei jeder Datei geht: Manche ISO-Dateien sind so gebaut, dass sie sich nichts merken können – zum Beispiel Installationssticks. Dann steht unter dem Regler „Diese ISO-Datei kann sich keine Änderungen merken.“ LiveStick sagt es dir also, bevor du schreibst.
Why it does not work with every file: some ISO files are built so that they cannot remember anything – installer sticks, for example. Then the slider says “This ISO file cannot keep changes.” So LiveStick tells you before you write.
Wie groß? Das bestimmst du. Je größer, desto mehr passt hinein – der Rest des Sticks gehört dem System. Reicht der Platz nicht, sagt LiveStick es dir.
How big? That is up to you. The bigger, the more fits in – the rest of the stick belongs to the system. If there is not enough room, LiveStick tells you.
Immer über das Menü herunterfahren. Bei den meisten Systemen hält LiveStick deine Änderungen während der Arbeit im Arbeitsspeicher und schreibt sie beim Herunterfahren oder Neustarten auf den Stick – das macht den Start schneller und schont den Stick. Beim einfachen Ausschalten gehen die Änderungen dieser Sitzung verloren. (Void und Devuan schreiben sofort auf den Stick.)
Always shut down from the menu. With most systems LiveStick keeps your changes in memory while you work and writes them to the stick when you shut down or restart – that makes starting faster and is gentle on the stick. If you simply switch off, the changes of this session are lost. (Void and Devuan write to the stick straight away.)
Formatieren – welches Dateisystem wofür?
Formatting – which file system for what?
LiveStick wählt selbst vor. Wer will, kann wechseln – hier steht, was die Namen bedeuten.
LiveStick preselects for you. If you want to change it, here is what the names mean.
Kurz gesagt: Für einen Start-Stick nimmt LiveStick FAT32 – das versteht jeder Rechner. Steckt in der Datei ein Einzelstück über 4 Gigabyte, geht das nicht mehr; dann wird NTFS genommen. Bei einem gewöhnlichen Datenstick hast du die freie Wahl.
In short: for a boot stick LiveStick uses FAT32 – every computer understands it. If the image contains a single file larger than 4 gigabytes that is not possible; then NTFS is used. For a plain data stick you are free to choose.
FAT32 – der Klassiker. Jeder Rechner, jedes Autoradio, jeder Fernseher liest ihn. Eine einzelne Datei darf aber höchstens 4 Gigabyte groß sein. Für Start-Sticks der Normalfall.
FAT32 – the classic. Every computer, car radio and television reads it. But a single file may not exceed 4 gigabytes. The normal case for boot sticks.
FAT – der kleine Bruder, nur für sehr kleine Sticks unter 4 Gigabyte.
FAT – the little brother, only for very small sticks below 4 gigabytes.
NTFS – das Dateisystem von Windows. Kennt keine 4-Gigabyte-Grenze. Nimm es, wenn große Dateien drauf sollen und der Stick auch an Windows-Rechnern benutzt wird.
NTFS – the file system of Windows. No 4-gigabyte limit. Use it when large files are involved and the stick is also used on Windows computers.
exFAT – gedacht für genau diesen Fall: große Dateien, und trotzdem lesen es Windows, Mac und Linux. Gut für Fotos und Filme.
exFAT – made for exactly this case: large files, and still readable by Windows, Mac and Linux. Good for photos and films.
UDF – das Format der DVD. Es kennt keine Größengrenze und wird von fast allem gelesen. Eine ruhige Wahl, wenn der Stick nur Daten trägt.
UDF – the DVD format. No size limit, and almost everything reads it. A calm choice if the stick only carries data.
ext4 (und ext2, ext3) – die Dateisysteme von Linux. Nur Linux liest sie, dafür bleiben Rechte, Besitzer und Verknüpfungen erhalten. Richtig, wenn der Stick nur an Linux-Rechnern läuft – zum Beispiel für Sicherungen.
ext4 (and ext2, ext3) – the Linux file systems. Only Linux reads them, but permissions, owners and links are kept. Right if the stick only runs on Linux computers – for backups, for example.
btrfs, XFS, F2FS, JFS – für Sonderfälle unter Linux. F2FS ist eigens für Flash-Speicher gemacht und schont den Stick, btrfs kann Momentaufnahmen, XFS ist stark bei sehr großen Dateien, JFS ist sparsam. Sie erscheinen nur, wenn der Stick groß genug ist (F2FS ab 128 MB, btrfs ab 256 MB, XFS ab 512 MB). Die Werkzeuge dafür kommen beim Installieren mit.
btrfs, XFS, F2FS, JFS – for special cases on Linux. F2FS is made for flash memory and is gentle on the stick, btrfs can take snapshots, XFS is strong with very large files, JFS is frugal. They only appear if the stick is big enough (F2FS from 128 MB, btrfs from 256 MB, XFS from 512 MB). The tools for them come along when installing.
Warum manche fehlen: LiveStick zeigt nur, was auf deinem Rechner wirklich geht. Fehlt das Formatierwerkzeug, steht das Dateisystem gar nicht erst in der Liste – lieber keine Auswahl als eine, die abbricht.
Why some are missing: LiveStick only shows what really works on your computer. If the formatting tool is absent, the file system is not offered at all – better no choice than one that fails.
Schnell oder gründlich: Schnell schreibt nur das Inhaltsverzeichnis neu – das dauert Sekunden. Gründlich überschreibt den ganzen Stick und findet dabei kaputte Stellen; das dauert je nach Größe viele Minuten.
Quick or thorough: quick only rewrites the table of contents – that takes seconds. Thorough overwrites the whole stick and finds bad spots on the way; depending on the size that takes many minutes.
Datenträger messen
Measure the drive
Wie schnell ist der Stick – und ist er noch in Ordnung?
How fast is the stick – and is it still all right?
Unter der Datenträger-Karte steht „Datenträger messen“. Ein Klick – und LiveStick misst, wie schnell der Stick liest und schreibt, sucht dabei nach Fehlern und fragt den Zustand ab. Das dauert etwa eine Minute.
Below the drive card it says “Measure drive”. One click – and LiveStick measures how fast the stick reads and writes, looks for errors on the way and asks for its health. It takes about a minute.
Deine Dateien bleiben: Zum Messen wird eine Testdatei auf den Stick geschrieben und wieder gelöscht. Ist dafür kein Platz, fragt LiveStick: „Ohne Schreibtempo“ – oder „Löschen und messen“.
Your files stay: for the measurement a test file is written to the stick and deleted again. If there is no room for it, LiveStick asks: “Without write speed” – or “Erase and measure”.
Zustand: Nicht jeder Stick gibt seinen Zustand heraus. Dann steht dort ehrlich „verrät dieser Stick nicht“ – Lese- und Schreibtempo und die Fehlersuche gibt es trotzdem.
Health: not every stick reveals its health. Then it honestly says “this stick does not tell” – read and write speed and the error check are there all the same.
Datenträger prüfen: Gleich daneben steht „Datenträger prüfen“ – das geht auch ohne ISO-Datei. LiveStick beschreibt den ganzen Stick mit einem Muster, liest es zurück und zeigt am Ende kaputte Stellen, Lese- und Schreibtempo und den Zustand. Das kann lange dauern, und danach ist der Stick leer – LiveStick fragt vorher.
Check drive: right next to it is “Check drive” – it works without an ISO file, too. LiveStick writes a pattern across the whole stick, reads it back and at the end shows bad spots, read and write speed and the health. This can take a long time, and afterwards the stick is empty – LiveStick asks first.
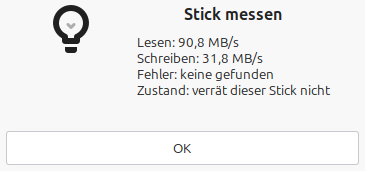
Ergebnis nach dem Messen.
The result after measuring.
Was es sonst noch kann
What else it can do
Windows-Installationssticks
Windows installer sticks
Die Windows-11-Datei wird erkannt und passend geschrieben. Vom Stick startet das Windows-Setup.
The Windows 11 file is recognised and written the right way. Windows Setup starts from the stick.
Profi-Einstellungen
Advanced settings
Partitionstabelle, Startart, Dateisystem (FAT32, NTFS, exFAT, UDF, ext4), Blockgröße, schnelles oder gründliches Formatieren – LiveStick wählt passend zur Datei vor.
Partition table, way to start, file system (FAT32, NTFS, exFAT, UDF, ext4), block size, quick or thorough formatting – LiveStick preselects what fits the file.
Nur formatieren
Format only
Der Knopf „Nur formatieren“ neben dem großen Knopf macht aus dem Stick – oder einer freigegebenen USB-Festplatte – einen gewöhnlichen Datenträger: Dateisystem wählen (bis zu elf), Name, schnell oder gründlich, dann „Jetzt formatieren“.
The “Format only” button next to the big button turns the stick – or an enabled USB hard disk – into an ordinary drive: choose the file system (up to eleven), the name, quick or thorough, then “Format now”.
Kaputte Stellen finden
Find bad spots
Beschreibt den ganzen Stick mit einem Muster und liest es wieder – so fallen kaputte Stellen auf. Das kann lange dauern.
Writes a pattern over the whole stick and reads it back – that way bad spots show up. It can take a long time.
Prüfung beim Starten
Check at boot
Auf Wunsch prüft ein kleines Programm beim Starten zuerst alle Dateien auf dem Stick – auf neuen Rechnern (UEFI).
If you like, a small program first checks all files on the stick when it starts – on new computers (UEFI).
Hilfe für alte Rechner
Help for old computers
Legt einen kleinen versteckten Zusatzbereich an und richtet die Aufteilung aus. Das hilft manchen alten Rechnern, den Stick zu erkennen.
Adds a small hidden extra area and aligns the layout. That helps some old computers to recognise the stick.
Warnt vor Secure Boot
Warns about Secure Boot
Würde der Stick auf einem Rechner mit eingeschaltetem Secure Boot abgewiesen, sagt LiveStick das vorher – und was du dann tun kannst.
If the stick would be refused on a computer with Secure Boot switched on, LiveStick says so beforehand – and what you can do about it.
Ruhe beim Schreiben
Calm while writing
Während LiveStick schreibt, springt kein Dateimanager-Fenster auf. Das Protokoll zeigt jederzeit, was gerade passiert.
While LiveStick writes, no file manager window pops up. The log shows at any time what is happening.
Abbrechen beim Schreiben
Cancel while writing
Unter dem Ring steht der Knopf „Abbrechen“. Danach ist der Datenträger nur halb beschrieben – einfach neu schreiben oder formatieren.
Below the ring there is a “Cancel” button. The drive is then only half written – simply write it again or format it.
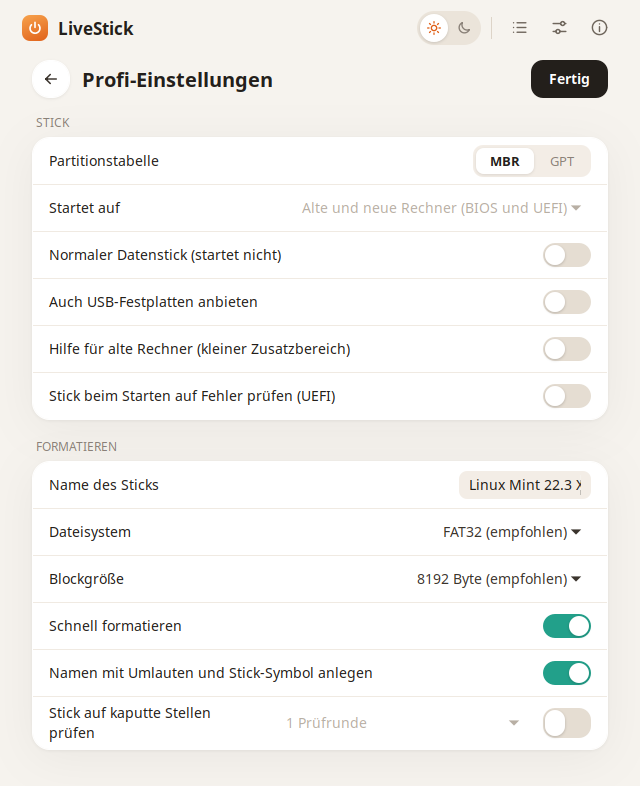
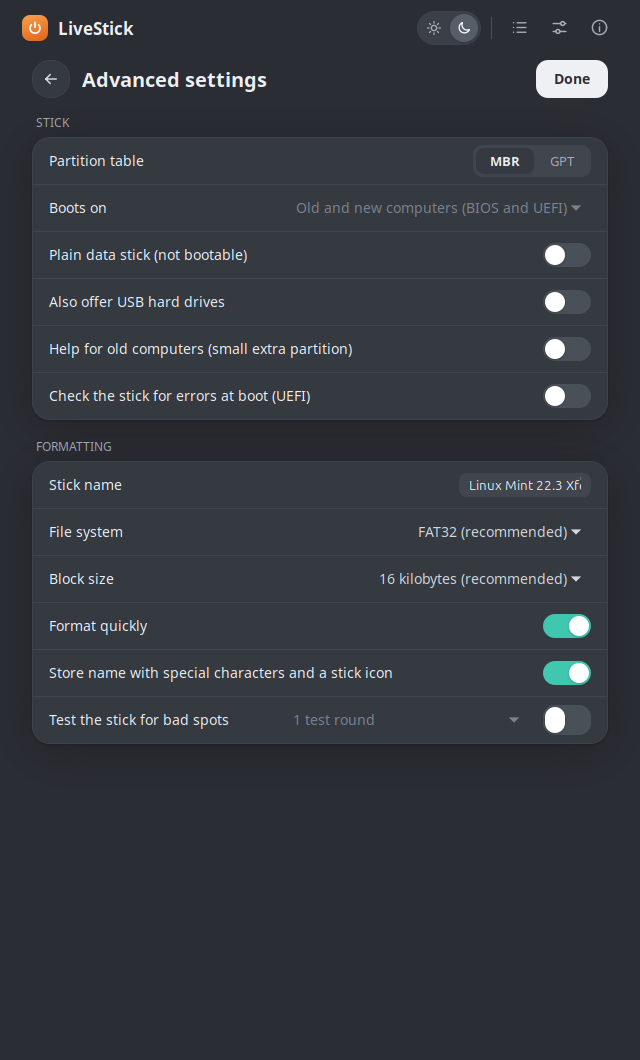
Die Profi-Einstellungen.
The advanced settings.
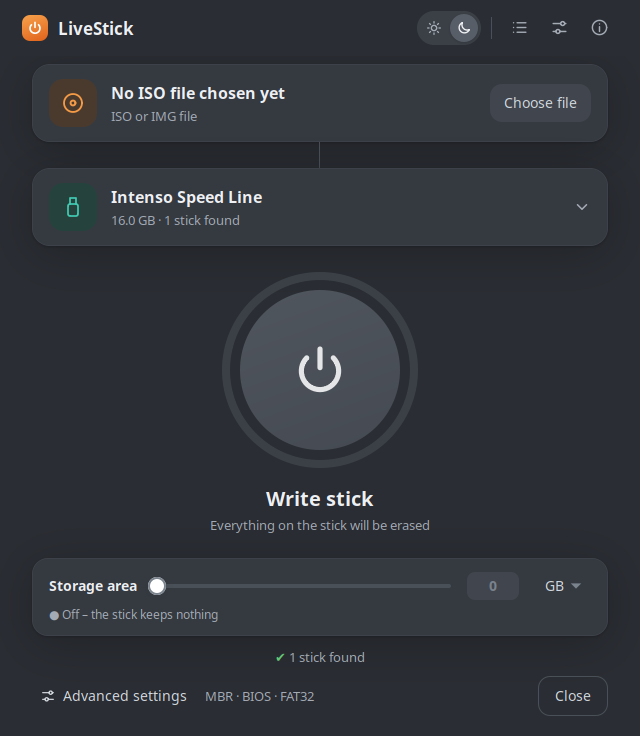
Auch dunkel – hier das englische Fenster.
Dark as well.
Freischalten – einmal, dann nie wieder
Unlocking – once, then never again
1. Oben auf Kostenlos anfordern drücken und Name, E-Mail und Land eintragen.
1. Press Get it free above and enter name, e-mail and country.
2. Die E-Mail öffnen – darin stehen dein Code und der Link zur Datei. Schau auch im Spam-Ordner nach.
2. Open the e-mail – it contains your code and the link to the file. Check your spam folder too.
3. Beim ersten Start den Code einmal eintippen und „Freischalten“ drücken. Das war es.
3. Type the code once at the first start and press “Unlock”. That is all.
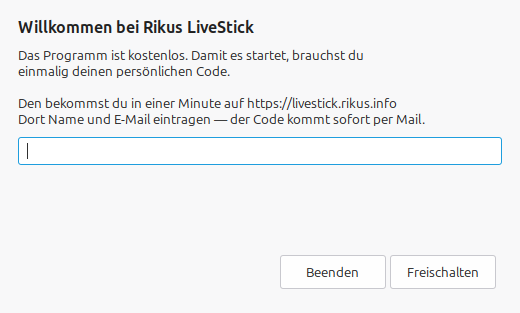
Beim ersten Start fragt LiveStick einmal nach dem Code.
At the first start LiveStick asks for the code once.
Die eigene Paketquelle
Our own package source
Einmal eintragen – und jede neue Fassung kommt von selbst.
Set it up once – every new version then arrives on its own.
Rikus LiveStick gibt es auch über die eigene Paketquelle apt.rikus.info.
Das ist dieselbe Technik, mit der dein System auch alle anderen Programme aktuell hält. Du trägst sie
einmal ein – danach erscheint jede neue Fassung ganz normal bei deinen Systemaktualisierungen.
Rikus LiveStick is also available from our own package source apt.rikus.info.
It is the same technique your system uses to keep all other programs current. You add it once –
after that every new version simply shows up with your normal system updates.
Schritt 1 – den Schlüssel holen. Damit erkennt dein Rechner, dass die Pakete wirklich von uns kommen und unterwegs niemand etwas verändert hat. Auf frisch installierten Rechnern fehlt oft das kleine Programm curl – der Befehl holt es gleich mit:
Step 1 – get the key. With it your computer can tell that the packages really come from us and that nobody changed anything on the way. Freshly installed computers often lack the small program curl – the command installs it first:
sudo apt update && sudo apt install -y curl && sudo install -d /etc/apt/keyrings && sudo curl -fsSL https://apt.rikus.info/rikus-apt.gpg -o /etc/apt/keyrings/rikus.gpgSchritt 2 – die Quelle eintragen. Eine einzige Zeile, die deinem System sagt, wo es nachschauen soll:
Step 2 – add the source. One single line telling your system where to look:
echo "deb [signed-by=/etc/apt/keyrings/rikus.gpg] https://apt.rikus.info stable main" | sudo tee /etc/apt/sources.list.d/rikus.listSchritt 3 – einspielen.
Step 3 – install.
sudo apt update && sudo apt install rikus-livestickBeim ersten Start fragt das Programm nach deinem Freischaltcode. Den bekommst du kostenlos über den Knopf oben auf dieser Seite – er wird einmal eingetippt und danach nie wieder verlangt.
On first start the program asks for your unlock code. You get it free of charge with the button at the top of this page – you type it once and are never asked again.
Du willst die Quelle wieder loswerden? Eine Zeile, und alles ist wie vorher – das Programm selbst bleibt installiert:
Want to remove the source again? One line and everything is as before – the program itself stays installed:
sudo rm /etc/apt/sources.list.d/rikus.list /etc/apt/keyrings/rikus.gpg && sudo apt updateEs bricht mit einer Meldung über Abhängigkeiten ab? Das passiert auf Debian 13 und LMDE 7, wenn dort das Zusatzlager backports eingeschaltet ist und schon Pakete daraus benutzt werden, zum Beispiel für Hyprland. Dann passen zwei Bausteine nicht zusammen. So klappt es:
It stops with “unmet dependencies”? This happens on Debian 13 and LMDE 7 when the backports repository is switched on and packages from it are already in use, for example for Hyprland. Then two building blocks do not fit together. This works:
sudo apt install -t trixie-backports rikus-livestickSo geht’s
How it works
1. Installieren. Am einfachsten über die Paketquelle oben. Oder die Datei über den Link aus der Mail holen und im Terminal installieren – mit dem Ordner, in dem sie liegt:
1. Install. Easiest through the package source above. Or get the file through the link in the e-mail and install it in a terminal – with the folder it is in:
sudo apt install ~/Downloads/rikus-livestick_1.5_all.debMeldet dein System „Nicht unterstützte Datei … auf Befehlszeile angegeben“, liegt die Datei nicht in diesem Ordner – dann den richtigen Ordner einsetzen.
If your system says “Unsupported file … given on commandline”, the file is not in that folder – then put in the right folder.
2. Starten. Rikus LiveStick steht im Startmenü unter „System“. Beim ersten Start den Code eintippen.
2. Start. Rikus LiveStick is in the application menu under “System”. Type the code at the first start.
3. Datei wählen. In der oberen Karte auf „Datei wählen“ drücken und die ISO-Datei aussuchen. Stick einstecken – er erscheint in der zweiten Karte.
3. Choose the file. Press “Choose file” in the top card and pick the ISO file. Plug in the stick – it appears in the second card.
4. Speicherbereich. Wer möchte, dass sich der Stick etwas merkt, schiebt den Regler auf die gewünschte Größe.
4. Storage area. If you want the stick to remember things, move the slider to the size you want.
5. Schreiben. Auf den großen Knopf „Datenträger beschreiben“ drücken, die Warnung mit OK bestätigen und dein Passwort eingeben.
5. Write. Press the big “Write to drive” button, confirm the warning with OK and enter your password.
6. Warten. Bis dasteht: „Fertig – der Datenträger ist bereit“. Dann den Stick abziehen.
6. Wait. Until it says “Done – the drive is ready”. Then unplug the stick.
7. Vom Stick starten. Stick in den Rechner stecken, einschalten und gleich das Startmenü des Rechners öffnen – die Taste hängt vom Hersteller ab, oft F12, F11, F9 oder Esc. Dort den Stick wählen.
7. Start from the stick. Plug the stick into the computer, switch on and open the computer’s boot menu right away – the key depends on the maker, often F12, F11, F9 or Esc. Choose the stick there.
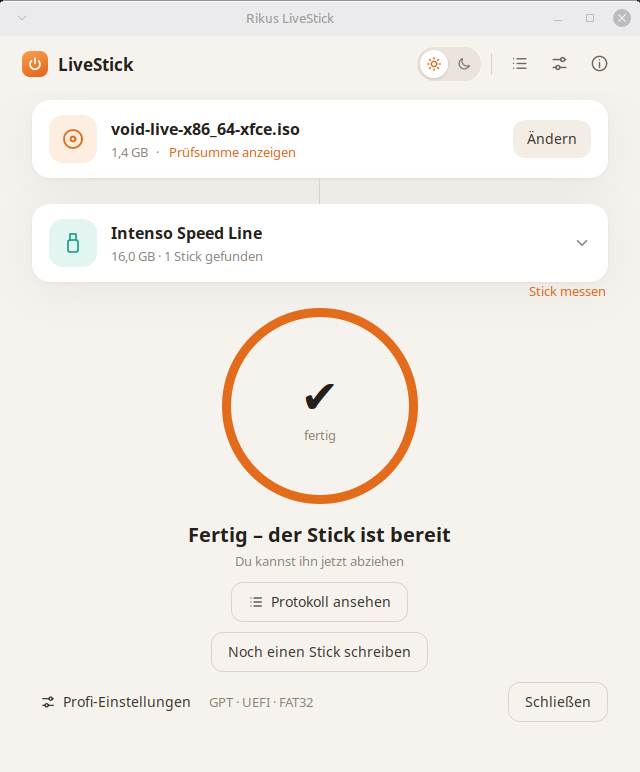
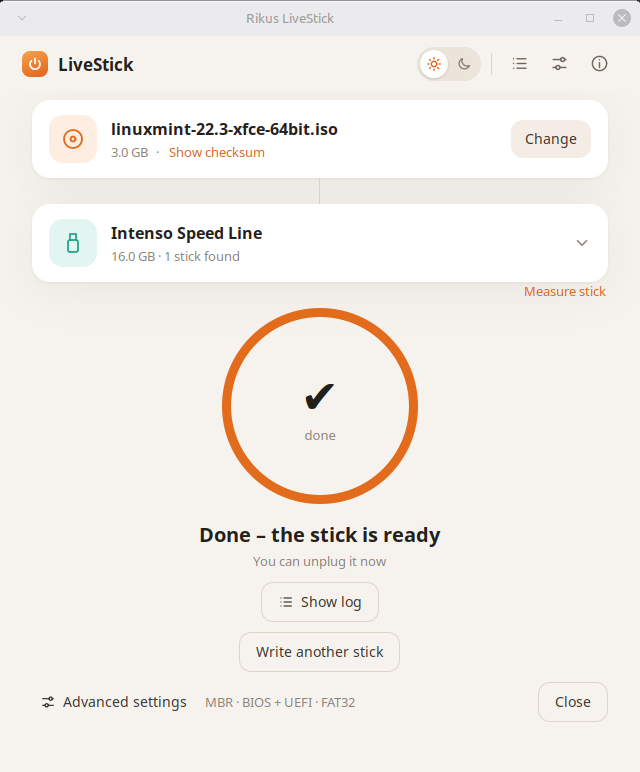
Fertig – jetzt kann der Stick abgezogen werden.
Done – now the stick can be unplugged.
Was es braucht
What it needs
Alles kommt beim Installieren von selbst mit – hier steht nur, wofür.
All of it comes along when installing – this only says what for.
Rikus LiveStick gibt es als Paket für Debian und verwandte Systeme wie Ubuntu und Linux Mint.
Rikus LiveStick comes as a package for Debian and related systems such as Ubuntu and Linux Mint.
Wird gebraucht:
Required:
python3,python3-gi,gir1.2-gtk-3.0,python3-gi-cairo– das Fenster selbst.pkexec(oderpolicykit-1) – fragt nach dem Passwort, bevor der Stick beschrieben wird.fdisk,util-linux,mount,coreutils– den Stick aufteilen, alte Aufteilung entfernen, 1:1 schreiben.dosfstools– legt FAT32 an.e2fsprogs– legt den Speicherbereich an.rsync– kopiert die Dateien der ISO-Datei auf den Stick.cpio– bereitet bei den meisten Systemen den Speicherbereich vor.zstd– packt bei manchen Systemen die Startdateien aus, um sie für den Speicherbereich vorzubereiten.syslinux-common– Startprogramm für alte Rechner.extlinux– Startprogramm für alte Rechner, wenn der Stick ext4 trägt (MX Linux, antiX).exfatprogs– legt exFAT an.ntfs-3g– legt NTFS an (für Windows-Sticks und große Dateien).
python3,python3-gi,gir1.2-gtk-3.0,python3-gi-cairo– the window itself.pkexec(orpolicykit-1) – asks for the password before the stick is written.fdisk,util-linux,mount,coreutils– divide the stick, remove the old layout, write 1:1.dosfstools– creates FAT32.e2fsprogs– creates the storage area.rsync– copies the files of the ISO file to the stick.cpio– prepares the storage area for most systems.zstd– unpacks the start files of some systems to prepare them for the storage area.syslinux-common– boot program for old computers.extlinux– boot program for old computers when the stick uses ext4 (MX Linux, antiX).exfatprogs– creates exFAT.ntfs-3g– creates NTFS (for Windows sticks and large files).
Kommt automatisch mit:
Comes along automatically:
udftools– das Dateisystem UDF.syslinux– richtet das Startprogramm für alte Rechner ein.btrfs-progs,xfsprogs,f2fs-tools,jfsutils– die Dateisysteme btrfs, XFS, F2FS und JFS beim Formatieren.grub-efi-amd64-bin,grub-common– der Starter für Manjaro und openSUSE mit Speicherbereich.mtools– holt bei manchen Dateien den Startordner für neue Rechner heraus.p7zip-full(oder7zip) – liest Windows-ISO-Dateien.xorriso– ein Hilfsprogramm für ISO-Dateien.smartmontools– fragt beim „Datenträger messen“ den Zustand ab.parted,udev– lesen den Stick nach dem Aufteilen neu ein.
udftools– the UDF file system.syslinux– sets up the boot program for old computers.btrfs-progs,xfsprogs,f2fs-tools,jfsutils– the btrfs, XFS, F2FS and JFS file systems for formatting.grub-efi-amd64-bin,grub-common– the boot loader for Manjaro and openSUSE with a storage area.mtools– takes the boot folder for new computers out of some files.p7zip-full(or7zip) – reads Windows ISO files.xorriso– a helper program for ISO files.smartmontools– asks for the health when measuring the drive.parted,udev– re-read the stick after partitioning.
Gut zu wissen
Good to know
Alles auf dem Stick wird gelöscht. Beim Schreiben verschwindet, was vorher darauf war. Wichtige Dateien also vorher woanders hin kopieren.
Everything on the stick is erased. Whatever was on it before is gone after writing. So copy important files somewhere else first.
Fehler anonym melden. Geht beim Schreiben etwas schief, schickt LiveStick eine kurze Meldung an rikus.info: welche Fassung, welches System und was schiefging – ohne Namen, ohne E-Mail-Adressen und ohne deine Ordnernamen. Abschalten kannst du das oben rechts unter „Einstellungen“.
Anonymous error reports. If something goes wrong while writing, LiveStick sends a short report to rikus.info: which version, which system and what went wrong – without names, without e-mail addresses and without your folder names. You can switch this off at the top right under “Settings”.